
Create vector layers using PostGIS and QGIS
The goal of this post is to show how PostGIS and QGIS can be used to create spatial data not bound to Earth. Why bother? As I explained in a recent bug report, there are few valid examples of non-Earth use cases for PostGIS:
- Medical (Howard Hughes Medical Institute case study)
- Fictional worlds
- Space
- Example (teaching) data sets
For this post I focus on creating a fictional world for use in a novel. Most fictional worlds mimic familiar attributes and properties we know on Earth, such as roads, cities, government boundaries, buildings, rivers, lakes and so on. The difference in a fiction world are all the names, locations, routes and details!
This post is part of the series PostgreSQL: From Idea to Database.
Planning for the world
When starting a new database project, start by planning and documenting your expectations for the data. This is very important.
First up is the choice of units for distance.
I like using one kilometer (km = 1) as the base unit because of the ability
to easily convert between km and meters (m = 0.001).
Making this conversion a mentally-easy task is important because some elements
span large distances (government boundaries, rivers) while others are rather small
(buildings, trees, sidewalks). While QGIS and a GUI will be used for some tasks,
other tasks will be done in SQL code and these scale conversions will be done regularly.
If I were to choose to use miles, being the dominant distance measurement the U.S.,
all the conversions require a calculator in order for my conversions to be accurate.
Making mile = 1 would mean the small units to choose from are either the foot
(ft = 0.000189) or the yard (yd = 0.000568). Ew.
The other part of planning is to define the data are we collecting and how should it be organized. Lucky for me I have many years of experience working with OpenStreetMap (OSM) data in PostGIS. I'm not keeping things exactly the same, because there is a lot in OSM that we don't need right away. We will pull three basic layers from the list of tables under the New Structure section:
- boundary (polygon)
- road (line)
- building (point)
These layers allow us to define larger regions, such as the town the story's hero lives in, and smaller points of interest, such as the hero's house (point).
Prepare the database
Connect to your PostgreSQL server for the following steps.
The following two SQL commands ensure that the PostGIS extension is installed
and creates a schema (my_world) to organize your database objects together.
I find using schemas to organize database objects helps keeps things
more manageable over the long term.
CREATE EXTENSION IF NOT EXISTS postgis;
CREATE SCHEMA IF NOT EXISTS my_world;
Databases live a notoriously long time. Following best practices helps avoid database Anti-Patterns.
Create table for boundaries
Create a boundary table in the my_world schema. The type column will allow us to
distinguish between towns, cities and countries both for querying purposes and formatting
the visualization in QGIS. While I would typically want to enforce constraints (limit the
the available types, require a name, etc) for early exploring and testing this is
easier to work with. See my preceding note about following best practices!
CREATE TABLE my_world.boundary
(
    id BIGSERIAL NOT NULL PRIMARY KEY,
    type TEXT,
    name TEXT,
    geom GEOMETRY (POLYGON, 0) NOT NULL -- Sets SRID to 0, e.g. Undefined
);
The spatial magic happens with the geom column
definition: geom GEOMETRY (POLYGON, 0) NOT NULL.
This creates the geom column with the
PostGIS data type
GEOMETRY,
in this case we are defining a
POLYGON
with SRID 0 (unknown).
To enable better spatial query performance as the data grows, add a GIST index
to the geom column.
CREATE INDEX GIX_boundary
    ON my_world.boundary
    USING GIST (geom)
;
It is a good habit to comment your objects. It might seem silly in a small example such as this, but once your database reaches any sort of size, every ounce of (succinct) documentation is helpful.
COMMENT ON TABLE my_world.boundary
    IS 'Example polygons in the fictitious world created in the blog post https://blog.rustprooflabs.com/2019/08/postgis-qgis-create-layers';
I know there are folks that argue against comments like this. It might be a little unnecessary, but my experience has found too many unknown objects just accumulate and cause confusion.
Adding town boundary
With our table created for boundary polygons we can add a town polygon directly
within Postgres/PostGIS. The following query creates a square polygon with each side
1 km long (1 spatial unit in our SRID = 0 world).
INSERT INTO my_world.boundary (type, name, geom)
SELECT 'Town', 'Slonik-ville',
        ST_MakePolygon(ST_MakeLine(geom))
    FROM (
        VALUES (ST_MakePoint(0, 0)),
                (ST_MakePoint(1, 0)),
                (ST_MakePoint(1, 1)),
                (ST_MakePoint(0, 1)),
                (ST_MakePoint(0, 0))
            ) AS points (geom)
;
If the above query makes your head spin a little, don't worry, it is a complex query. We will study that query after we check the results to ensure it worked:
SELECT name, ST_AsText(geom) AS geom FROM my_world.boundary;

name        |geom                          |
------------|------------------------------|
Slonik-ville|POLYGON((0 0,1 0,1 1,0 1,0 0))|
De-construct the query
To understand how the above query works, we start inside the FROM clause.
The VALUES list
above creates an in-memory table structure that can be queried like any regular database table.
The list is aliased as points with the single column of data
named geom (AS points (geom)). Each of the
ST_MakePoint() calls generates
a point geometry at the specified coordinates (e.g. (0, 1)). These points are needed
to construct our polygon, as polygons are created from lines, and lines consist of points.
To illustrate this step at work, we can run the following query to see our pseudo-table.
VALUES (ST_MakePoint(0, 0)),
        (ST_MakePoint(1, 0)),
        (ST_MakePoint(1, 1)),
        (ST_MakePoint(0, 1)),
        (ST_MakePoint(0, 0));

column1   |
----------|
POINT(0 0)|
POINT(1 0)|
POINT(1 1)|
POINT(0 1)|
POINT(0 0)|
Note: Running this without the FROM clause took away the alias creation so our column here is simply named
column1.
The VALUES query is then wrapped inside the FROM, a simplified look at that
is FROM (<value query>) AS points (geom). This makes the VALUES list available
for our final aggregation steps.
The SELECT clause of the outer query handles that task
with ST_MakePolygon(ST_MakeLine(geom)). This nests two PostGIS functions,
ST_MakeLine()
and
ST_MakePolygon().
The inner ST_MakeLine(geom) turns the point geometry rows into a line
that ST_MakePolygon() turns into a polygon.
The final part to examine is the INSERT portion that defines where to save the results
of the query we have built. Because the id column is controlled by an auto-incrementing
sequence (defined by BIGSERIAL) we must define the remaining columns we wish to insert into.
INSERT INTO my_world.boundary (type, name, geom)
Load table as QGIS Layer
With our boundary table created and a simple polygon added, it is time to load the data
into QGIS.
Create a
connection from QGIS
to your PostGIS server and navigate to and expand the my_world schema in the Browser panel.
Tables can be added to QGIS by simply dragging them down into the Layers.
When prompted by the Coordinate Reference System Selector dialog I select
the USER:100000 option so QGIS knows this doesn't relate to Earth.
I feel there should be a better SRID to use in QGIS but I haven't found any issue with this method to date.
The following animation shows the process of loading the data and making this selection. When it loads, you can see that the square polygon we created is really a square!
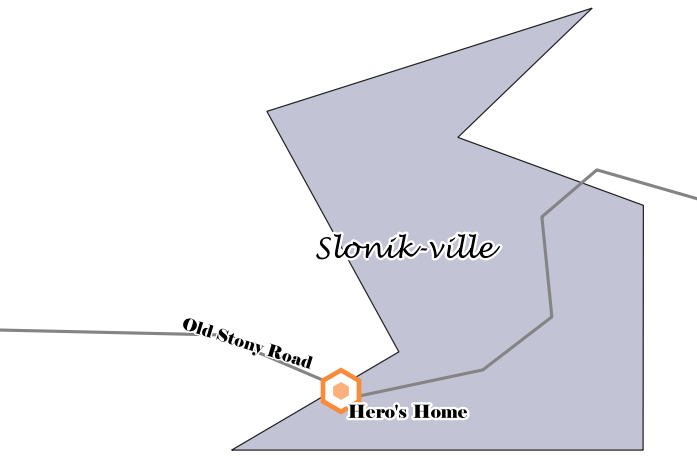
Edit Town Polygon from QGIS
The simple square is a bit bland for our fictional town Slonik-ville. We can use QGIS to edit the polygon to a more likely shape. Select the boundary layer and click the pencil icon to enable edit mode. The icon to the left of the layer will update with the pencil as an indicator of which layers are currently edit-able.
The QGIS docs covers editing data with QGIS in depth.
The following animation shows what the editing process can look like in QGIS.
Back in Postgres, rerun the previous query to see the edited polygon in its new raw form. Notice we no longer have nice, round, easy numbers! Also, the number of points included in this polygon has grown.
SELECT name, ST_AsText(geom) AS geom FROM my_world.boundary;

|name        |geom
|------------|-----------------------------------------------------------------------------
Slonik-ville |POLYGON((0 0,1 0,1.00069444444444 0.594791666666666,0.549826388888889 0.760069444444444,0.876041666666667 1.07413194444444,0.085590277777778 0.823263888888888,0.406423611111111 0.238715277777777,0 0))
More tables
With basic data entry and editing covered we will create the other two tables identified
at the beginning. The major difference on these tables is the road table creates a
LINESTRING and the building table uses POINT.
CREATE TABLE my_world.road
(
    id BIGSERIAL NOT NULL PRIMARY KEY,
    surface TEXT,
    width_m INT DEFAULT 3,
    name TEXT,
    geom GEOMETRY (LINESTRING, 0) NOT NULL
);
CREATE INDEX GIX_road
    ON my_world.road
    USING GIST (geom)
;
COMMENT ON TABLE my_world.road
    IS 'Example lines for the fictitious world created in the blog post https://blog.rustprooflabs.com/2019/08/postgis-qgis-create-layers';

CREATE TABLE my_world.building
(
    id BIGSERIAL NOT NULL PRIMARY KEY,
    name TEXT,
    geom GEOMETRY (POINT, 0) NOT NULL
);
CREATE INDEX GIX_building
    ON my_world.building
    USING GIST (geom)
;
COMMENT ON TABLE my_world.building
    IS 'Example points for the fictitious world created in the blog post https://blog.rustprooflabs.com/2019/08/postgis-qgis-create-layers';
Add new features via QGIS
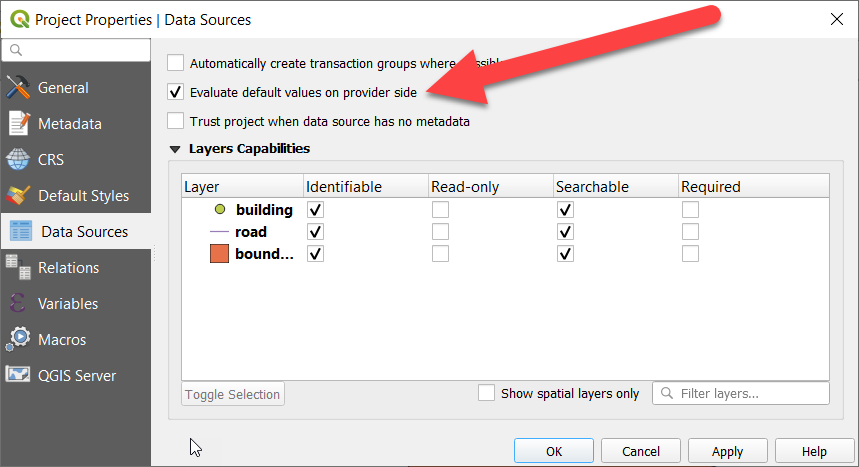
Before adding new features via QGIS there is a QGIS Project setting that needs adjusting.
Under the
Data Sources options,
ensure "Evaluate default values on provider side" is checked.
Enabling this setting allows PostGIS to retain full control over default values, such as
our PRIMARY KEY values (BIGSERIAL) or other defaults (width_m INT DEFAULT 3).
Create more data
To add your first road, select the road layer in QGIS Layers, activate editing and use
the "Add Line Feature" option. Left-click to start adding your new feature, each left
click adds a new point. To stop adding points, right-click to open the Feature Attributes
dialog for adding attribute details. The following animation illustrates this process,
and also highlights how QGIS detects the next PRIMARY KEY value and the DEFAULT for
the width_m column.
Adding points is straight forward, each left click creates a new point.
Layer Styles (saving them!)
One more great thing about using PostGIS with QGIS is it's extremely simple to save your layer styles directly to the database. This way, your database backups (you do have reliable, tested backups, right?!) will include all the symbology as well as the underlying data! Styling layers (symbology) in QGIS is beyond the scope of this blog post. The QGIS training manual has a chapter on symbology that provides a thorough overview of the process. For this example, I quickly added some simple styling to the three layers to improve colors and add labels.
To save the formatting to PostGIS, open the layer's properties dialog and click the "Styles" button at the lower left. Click "Save Style", change the "save style" option at the top to "in the database (postgres)" and name the style. Checking the "use as default style for this layer" allows QGIS to automatically load this style any time the layer is added to a project. This is very handy, and only available when saving the data and the style both in PostGIS.
This creates a new table in Postgres in the public schema named layer_styles.
Examining the data stored in Postgres for the boundary table looks like this, note the
XML data for the style itself is not shown for brevity.
SELECT *
    FROM public.layer_styles
    WHERE f_table_schema = 'my_world'
        AND f_table_name = 'boundary'
;

Name             |Value                  |
-----------------|-----------------------|
id               |1                      |
f_table_catalog  |your_db                |
f_table_schema   |my_world               |
f_table_name     |boundary               |
f_geometry_column|geom                   |
stylename        |boundary_polygon       |
styleqml         |[XML]                  |
stylesld         |[XML]                  |
useasdefault     |true                   |
description      |Sun Aug 4 08:36:06 2019|
owner            |your_gis_user          |
ui               |                       |
update_time      |2019-08-04 14:36:06    |
When saving QGIS styles to PostGIS, ensure your Postgres instance is up-to-date on minor releases that include the XML bug fix.
Data export
I expect to write more posts that expand on this topic in the future. To make this easier
I have taken a logical dump of the database using pg_dump.
It is available to download
here.
pg_dump -d qgis_demo -U your_gis_user \
    --no-owner \
    -f slonikville-postgis-v1.sql
Summary
In this post I have covered the basics of using QGIS and PostGIS together to create and visualize vector data. I have focused on spatial data for a fictitious world, not related to Earth. In future posts I plan to cover more of the advanced features available in PostGIS that make this such an amazing system.
Need help with your PostgreSQL servers or databases? Contact us to start the conversation!
 Mastodon