
Installing PostgreSQL and PostGIS from source
This post walks through the process of building and installing PostgreSQL
and PostGIS from source on a Raspberry Pi. Building from source
might not be for everyone, but having this skill opens the doors to a number of
new opportunities. With a little experience with Linux and the command line this
task can quickly become second nature.
Yes, it is more involved than running apt install and it will take longer.
What you gain is the ability to test new features, bug fixes, review
Commitfest patches, and ultimately have
more understanding about what is installed and how.
You'll probably also learn a thing (or 10) in the process... I know I did!
This post is part of the series PostgreSQL: From Idea to Database.
Nuances of the Pi
My main driver to install from source on the Pi is the lack of availablity of
version choices with software via apt.
Raspbian OS,
being a customized ARM-specific derivitive of Debian has its challenges,
and Rasbian Jesse easily can install the 9.6 line, typically
lagging 1-3 minor releases from current.
I've never had success getting the PGDG repos to work on the Pi either,
and while 9.6 isn't that old (< 3 years) there are a ton of
improvements and features in the major releases since.
With Raspbian Buster was released (June 2019) PostgreSQL 11.4 and PostGIS 2.5 were available, the latest released versions of both! As you can tell, I was a bit excited for the discovery:
Raspbian's new Buster image installs #PostgreSQL11 instead of 9.6! 🤓#RaspberryPi #PostgreSQL pic.twitter.com/jj9egUlXvZ
— RustProof Labs (@RustProofLabs) July 8, 2019
While that is awesome today, in the next few months we should see both PostgreSQL 12 and PostGIS 3.0 released, and I don't expect another built-in upgrade in major versions until whatever replaces Buster comes out. There are a lot of really cool improvements in Pg12 that I intend to take full advantage of.
While this post is specifically targeted for the Raspberry Pi and its Raspbian OS, the basic instructions should work for the related Debian and Ubuntu OSs.
Getting the Pi ready
Download and install Raspbian if you haven't already. This post provides specific instructions for both the Jesse and Buster where the process deviates. While Raspbian Buster is released, it does not yet provide support for Mathmatica at the time of writing. Until that resolves I expect a large number of Raspbian Jesse users to remain.
This guide uses three Linux users, an unspecified user with sudo privileges
and the root and postgres users. If you are using the default pi user
(not really recommended) you need to change the password from its well-known default.
Install required software
Install the prerequisite software while logged in as your user with sudo privileges.
The first step of installing pre-req software has differences between the OS versions.
The only difference between the following two commands are the libreadline version,
though I have included each apt install command in its entirety for copy/paste convenience.
Raspbian Jesse pre-reqs
user@pi:~$ sudo apt install git libxml2 libxml2-dev libreadline6 libreadline6-dev flex bison libbison-dev build-essential zlib1g-dev libxslt-dev libssl-dev postgresql-server-dev-all libxml2-utils xsltproc
Raspbian Buster pre-reqs
user@pi:~$ sudo apt install git libxml2 libxml2-dev libreadline7 libreadline-gplv2-dev flex bison libbison-dev build-essential zlib1g-dev libxslt-dev libssl-dev postgresql-server-dev-all libxml2-utils xsltproc
The rest of the PostgreSQL installation is the same regardless of which of the two OSs you are using.
Create User
In the terminal, create the postgres user if it doesn't exist.
user@pi:~$ sudo adduser postgres
This user may already exist causing you to get a warning
adduser: The user postgres' already exists.. This is OK.
Get the source code
Switch to the postgres user in its home directory.
user@pi:~$ sudo su - postgres
postgres@pi:~$
Create a directory to clone into (~/git) and clone the PostgreSQL repository.
If you clone the full repository it will take a few minutes on the Raspberry Pi,
it's a few hundred MB. Instead, the following command clones just the
specific branch for the version we wish to install (-b REL_12_STABLE )
and uses a
shallow clone
(--depth 1) to minimize the download. This method has two distinct advantages:
a) faster for you; and b) nicer on the git server.
postgres@pi:~$ mkdir git && cd ~/git
postgres@pi:~/git/postgresql$ git clone -b REL_12_STABLE \
    --depth 1 \
    https://git.postgresql.org/git/postgresql.git
This should result in output similar to:
Cloning into 'postgresql'...
remote: Counting objects: 6000, done.
remote: Compressing objects: 100% (5541/5541), done.
remote: Total 6000 (delta 718), reused 2238 (delta 263)
Receiving objects: 100% (6000/6000), 23.03 MiB | 6.98 MiB/s, done.
Resolving deltas: 100% (718/718), done.
Checking out files: 100% (5592/5592), done.
Change into the cloned postgresql repo.
cd postgresql
Within the repo we can verify which branch is checked out.
postgres@pi:~/git/postgresql$ git branch
* REL_12_STABLE
We can also check the log and see there is only 1 commit of history. The single commit you see listed will almost certainly be different than the one I show here.
postgres@pi:~/git/postgresql$ git log --oneline
ff597b6 docs:  remove pg_roles mention of the oid column being displayed
Even the
STABLEbranch of a non-production version should be used with caution! PostgreSQL 12 is currently in Beta with first production release expected in Fall 2019. See PostgreSQL versioning for more details.
Apply patches (Optional)
If you are testing changes to the PostgreSQL source code,
now is the time to apply your patch. Make sure it's available at a path
the postgres user has permissions to and run the command:
postgres@pi:~/git/postgresql$ git apply -p1 < /path/to/your.patch
Configure Postgres
See the Postgres short version for the basic outline of the steps to come.
Use ./configure --help to see the full range of options. The instructions
show using configure without options, I always add at least two for
my needs. Because I use PostGIS with QGIS layer styles, I need XML support,
hence --with-libxml. My default pg_hba.conf only provides hostssl
for non-local connections so I also need SSL support.
postgres@pi:~/git/postgresql$ ./configure \
    --with-libxml --with-openssl

checking build system type... armv7l-unknown-linux-gnueabihf
checking host system type... armv7l-unknown-linux-gnueabihf
checking which template to use... linux
checking whether NLS is wanted... no
checking for default port number... 5432
checking for block size... 8kB
checking for segment size... 1GB
checking for WAL block size... 8kB
...
During this step there will be a lot of lines stating the checks for various
components. If your system is missing something important it will fail and tell you
why. Its explanation may seem cryptic, but copy key words and search
for install <keyword> on <OS> and you're likely to find pointers to what
you need.
Make Postgres
This is the step that takes a while, on a Raspberry Pi 3B this takes about 35
minutes. Leaving off the world from make will save you about 10 minutes.
I run make world because I need the contrib modules installed so HSTORE is
available for osm2pgsql.
postgres@pi:~/git/postgresql$ make world
For quite a while before you see the "installation complete" message there will be a lot of messy text scrolling across the screen. At times it might not update for a little while, other times it will scroll so fast you can't read it all. It starts something like this...
--set-version=12 ../../../src/include/catalog/pg_proc.h ../../../src/include/catalog/pg_type.h ../../../src/include/catalog/pg_attribute.h ../../../src/include/catalog/pg_class.h ../../../src/include/catalog/pg_attrdef.h ../../../src/include/catalog/pg_constraint.h ../../../src/include/catalog/pg_inherits.h ../../../src/include/catalog/pg_index.h ../../../src/include/catalog/pg_operator.h ../../../src/include/catalog/pg_opfamily.h ../../../src/include/catalog/pg_opclass.h ../../../src/include/catalog/pg_am.h ../../../src/
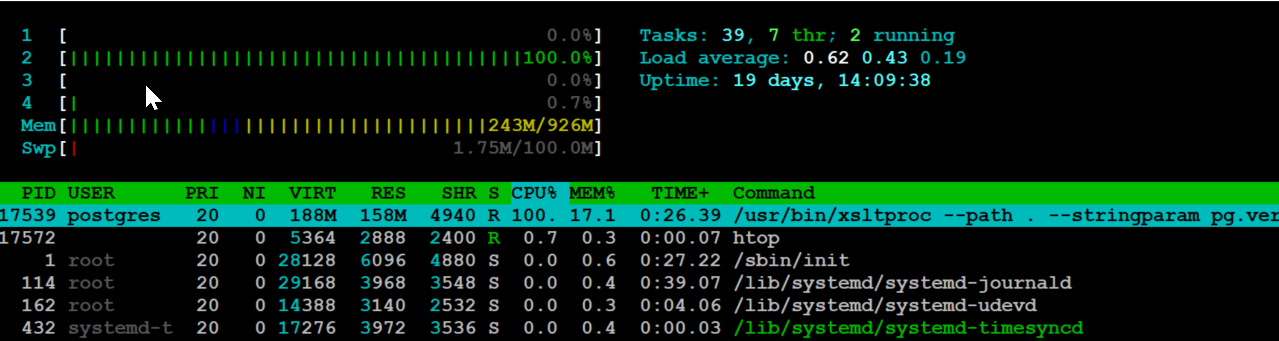
When running long operations I typically have a second terminal open and use htop to monitor what's running. This is especially helpful on the Raspberry Pi, which
often runs significantly slower than my internal clock expects. The following
screenshot shows the output from htop while installing PostgreSQL 11 from source
with Raspbian Jesse.
Install Postgres
When the make step completes, exit from the postgres user and switch to root.
postgres@pi:~/git/postgresql$ exit
user@pi:~$ sudo su - root
As root, change to the postgres directory where the source code was just made
and install. This shouldn't take more than 30 seconds.
root@pi:~# cd /var/lib/postgresql/git/postgresql
root@pi:/var/lib/postgresql/git/postgresql# make install-world
…
…
…
PostgreSQL, contrib, and documentation installation complete.
Setup directory for database data and make the postgres user the owner.
root@pi:~# mkdir /usr/local/pgsql/data
root@pi:~# chown postgres /usr/local/pgsql/data
Start PostgreSQL
Switch back to the postgres user and initdb and start!
root@pi:~# su - postgres
postgres@pi:~$ /usr/local/pgsql/bin/initdb -D /usr/local/pgsql/data

The files belonging to this database system will be owned by user "postgres".
This user must also own the server process.

The database cluster will be initialized with locale "en_US.UTF-8".
The default database encoding has accordingly been set to "UTF8".
The default text search configuration will be set to "english".

Data page checksums are disabled.

fixing permissions on existing directory /usr/local/pgsql/data ... ok
creating subdirectories ... ok
selecting dynamic shared memory implementation ... posix
selecting default max_connections ... 100
selecting default shared_buffers ... 128MB
selecting default time zone ... US/Mountain
creating configuration files ... ok
running bootstrap script ... ok
performing post-bootstrap initialization ... ok
syncing data to disk ... ok

initdb: warning: enabling "trust" authentication for local connections
You can change this by editing pg_hba.conf or using the option -A, or
--auth-local and --auth-host, the next time you run initdb.

Success. You can now start the database server using:

    /usr/local/pgsql/bin/pg_ctl -D /usr/local/pgsql/data -l logfile start
The init command helpfully outputs the exact command needed to start our newly created Postgres instance.
postgres@pi:~$ /usr/local/pgsql/bin/pg_ctl -D /usr/local/pgsql/data -l logfile start

waiting for server to start.... done
server started
Verify that psql can connect and the correct version is installed.
postgres@pi:~$ /usr/local/pgsql/bin/psql -c "SELECT version();"
┌─────────────────────────────────────────────────────────────────────────────────────────────────────────────┐
│                                                   version                                                   │
╞═════════════════════════════════════════════════════════════════════════════════════════════════════════════╡
│ PostgreSQL 12beta2 on armv7l-unknown-linux-gnueabihf, compiled by gcc (Raspbian 8.3.0-6+rpi1) 8.3.0, 32-bit │
└─────────────────────────────────────────────────────────────────────────────────────────────────────────────┘
Edit PATH
You may have noticed the commands above use lengthy commands with the
full path, such as /usr/local/pgsql/bin/psql. To make it possible to
use just the binary name, the PATH needs to be updated.
Exit to root.
postgres@pi:~# exit
Open the /etc/profile file to make this change for all users.
root@pi:~# nano /etc/profile
Add:
PATH=/usr/local/pgsql/bin:$PATH
export PATH
Now switch back to to the postgres user to test:
root@pi:~# su - postgres
postgres@pi:~$ which psql
/usr/local/pgsql/bin/psql
That last line shows that our binaries can now be found.
Test the psql command to ensure the correct version is installed. This should
match the output you received from the same command above.
postgres@pi:~$ psql -c "SELECT version();"

┌─────────────────────────────────────────────────────────────────────────────────────────────────────────────┐
│                                                   version                                                   │
╞═════════════════════════════════════════════════════════════════════════════════════════════════════════════╡
│ PostgreSQL 12beta2 on armv7l-unknown-linux-gnueabihf, compiled by gcc (Raspbian 8.3.0-6+rpi1) 8.3.0, 32-bit │
└─────────────────────────────────────────────────────────────────────────────────────────────────────────────┘
Intermission
Congratulations! You have a fully functional PostgreSQL server installed from source on your Raspberry Pi. If you want to install PostGIS as well, read on! The most time consuming and important steps are already completed.
Install PostGIS
Start as your user with sudo powers and install a few more pieces of software.
You can omit osm2pgsql if you do not plan to
import OpenStreetMap data.
user@pi:~$ sudo apt install libgdal-dev libgeos-dev osm2pgsql
PostGIS, PostgreSQL and Raspbian versions
Major PostGIS releases (2.3, 2.4, 2.5, 3.0) generally align with major PostgreSQL releases (9.6, 10, 11, 12). For example, the default versions on Rasbpian Jesse are PostgreSQL 9.6 and PostGIS 2.3; Raspbian Buster installs PostgreSQL 11 and PostGIS 2.5. There isn't a strict requirement to install specific versions with each other, as you will see.
That said, when I upgrade to PostgreSQL 12 in production
this fall, I intend to upgrade to PostGIS 3.0 at the same time.
Naturally, I want to test those two releases together. On Raspbian
Jesse, this isn't easy because Jesse won't install a new enough GEOS
via apt
for PostGIS 3.0. Trying to run ./configure on Jesse
with PostGIS 3.0 results in:
configure: error: PostGIS requires GEOS >= 3.6.0
You can install newer versions of GEOS from source, this post does not cover those steps. I made the effort once, it took 3+ hours IIRC, and that was on the second attempt. The easiest way to get a newer GEOS version is to use Buster.
The following installation walk through the process with the differences between installing PostGIS 3.0 on Buster and PostGIS 2.5 on Jesse.
PostGIS from source on Raspbian
Switch to the postgres user and download the desired PostGIS version
for your Postgres installation. Check the
PostGIS site for links
to the latest versions.
user@pi:~$ sudo su - postgres
Raspbian Buster
postgres@pi:~$ wget https://download.osgeo.org/postgis/source/postgis-3.0.0alpha3.tar.gz
postgres@pi:~$ tar xvzf postgis-3.0.0alpha3.tar.gz
postgres@pi:~$ cd postgis-3.0.0alpha3
Raspbian Jesse
postgres@pi:~$ wget https://download.osgeo.org/postgis/source/postgis-2.5.2.tar.gz
postgres@pi:~$ tar xvzf postgis-2.5.2.tar.gz
postgres@pi:~$ cd postgis-2.5.2
Configure
Within the PostGIS source directory:
postgres@pi:~/postgis-<version>$ ./configure
Jesse users might get a warning about outdated GEOS library. This is OK if you can handle the limitations of the older version.
configure: WARNING:  --------- GEOS VERSION WARNING ------------
configure: WARNING:   You are building against GEOS 3.5.1
configure: WARNING:   To take advantage of all the features of
configure: WARNING:   this PostGIS version requires GEOS 3.7.0 or higher.
configure: WARNING:   To take advantage of most of the features of this PostGIS
configure: WARNING:   we recommend GEOS 3.6 or higher
configure: WARNING:   You can download the latest versions from
configure: WARNING:   http://trac.osgeo.org/geos
configure: WARNING:
Make and install PostGIS
The make step for PostGIS takes about 6 minutes on the Pi 3B.
postgres@pi:~/postgis-<version>$ make
Exit the postgres user, switch to root to install.
postgres@pi:~$ exit
user@pi:~$ sudo su
root@pi:~# cd /var/lib/postgresql/postgis-<version>
root@pi:~# make install
Switch back to postgres user to create a database and test PostGIS.
root@pi:~# su - postgres
postgres@pi:~$ createdb gis_test
postgres@pi:~$ psql -d gis_test
Create the PostGIS extension:
([local]) postgres@gis_test=# CREATE EXTENSION postgis;
Version check on Buster with PostGIS 3.0:
([local]) postgres@gis_test=# SELECT PostGIS_Full_Version();
┌────────────────────────────────────────────────────────────────────────────────────────────────────────────────────┐
│                                                postgis_full_version                                                │
╞════════════════════════════════════════════════════════════════════════════════════════════════════════════════════╡
│ POSTGIS="3.0.0alpha3 r17573" [EXTENSION] PGSQL="120" GEOS="3.7.1-CAPI-1.11.1 27a5e771" PROJ="Rel. 5.2.0, September…│
│… 15th, 2018" LIBXML="2.9.4" LIBJSON="0.12.1"                                                                       │
└────────────────────────────────────────────────────────────────────────────────────────────────────────────────────┘
Version check on Jesse with PostGIS 2.5:
┌─────────────────────────────────────────────────────────────────────────────────────────────────────────────────┐
│                                              postgis_full_version                                               │
╞═════════════════════════════════════════════════════════════════════════════════════════════════════════════════╡
│ POSTGIS="2.5.2 r17328" [EXTENSION] PGSQL="120" GEOS="3.5.1-CAPI-1.9.1 r4246" PROJ="Rel. 4.9.3, 15 August 2016" …│
│…GDAL="GDAL 2.1.2, released 2016/10/24" LIBXML="2.9.4" LIBJSON="0.12.1" RASTER                                   │
└─────────────────────────────────────────────────────────────────────────────────────────────────────────────────┘
Get output similar to the above? Congratulations! You have installed PostgreSQL and PostGIS from source on your Raspberry Pi!
Summary
This post walked through the steps to install development versions of PostgreSQL and PostGIS from source on a Raspberry Pi. Once you work through the steps a couple of times with good instructions (this post is based on my own procedures) it really isn't that bad. Add in Ansible to automate the configuration and mostly the process is waiting. 45 minutes is a decent goal for the process start to finish on the Pi.
Need help with your PostgreSQL servers or databases? Contact us to start the conversation!
 Mastodon