
Introduction to the Go Map!! App
Do you want to contribute to OpenStreetMap on the go from your iOS device but don't know where to begin? This post discusses using the Go Map!! app available for free from the App store to do just that. This post assumes you have already created your OpenStreetMap account and have installed the Go Map!! app from the App store.
If you're using an Android smartphone you may want to check out Vespucci, though being an Apple user I have no way to try that out.
First Steps
The first thing to do when you open the Go Map!! app is to get acquainted with the toolbar options at the bottom of the screen.

The left-most option is the GPS icon that enables and disables use of GPS on your device. It has three states:
- Off
- Show my location
- Show my location with bearing rotation
The Off state is displayed in the screenshot above, with a blue outline but no fill. When GPS is activate the icon will look like this:

The first active state with GPS shows your location with the traditional blue dot. When the second state is enabled the map will rotate to follow your bearing. I personally prefer to have the map shown with North the to the top so almost never use the bearing rotation feature.
GPS is a huge drain on your mobile device's battery. Only enable it (in the app) when you really need it in order to conserve battery life.
The next two icons in the toolbar are the Undo and Redo buttons. They function as you would expect Undo and Redo to function. In the middle is the Plus icon (+). That's the button you use when you want to add something new which we'll cover more later. The last three buttons going right are the settings (page with gear), upload changes (up arrow into the cloud) and display options (folded map icon).
OpenStreetMap Login
Before you can make any changes to the OpenStreetMap data you must be logged in with a valid OpenStreetMap account. Open the Settings page by touching the settings icon (page with gear).
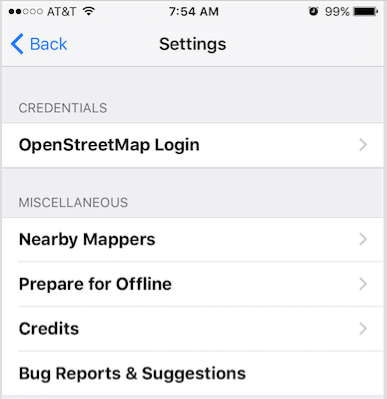
Touch the OpenStreetMap Login option to setup your credentials for OpenStreetMap. After entering your credentials click "Verify" at the top right to ensure your settings are entered correctly. You should be presented with a "Login successful" message.
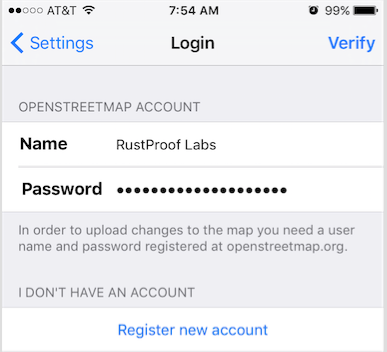
Now, you're ready to improve the map of the world around you!
Navigating and Selecting Data
If you've used any map application on your mobile device before, the basic navigation should feel right at home. You can touch and drag to pan around the map, and use "pinch" zooming to zoom in and out. The biggest difference is the way the map data is displayed, and the fact that you can see, select and edit all of the data included in OpenStreetMap. Touching any data element will select it and provide you with more details of your selection. Tapping in an area with no data points will unselect whatever you had previously selected. Making any selection will provide extra menu options at the bottom for more details and editing needs.
Basic Terminology
Spatial data has three main types of data:
- Node
- Way
- Polygon
Examples of nodes (points) are trees, fire hydrants, picnic tables, and stop signs. Ways (lines) are used for roads, sidewalks, rivers, cliffs, and hiking trails. Polygons are lines that start and end at the same place, typically used to represent buildings, parking lots, lakes and city boundaries.
Both ways and polygons include nodes to define the corners and angles that exist in the world around us.
Styling in the Editor
One major difference between viewing the data in a browser vs. the Go Map editor is that Go Map displays all of the data elements. This includes elements that typically don't display, such as stop signs and fire hydrants. The styling also isn't the same as what you are accustomed to. Sidewalks are bright green, highways and roads are gray, buildings have a black outline with a brown-ish interior, and many other data points are formatted in a generic fashion.
Selecting Data
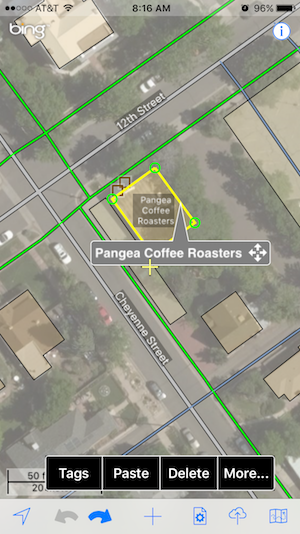
Selecting a building or way (such as streets, rivers, sidewalks, etc.) will highlight the affected lines in yellow. The nodes appear as green circles along the selected way.
Selecting a point (node) such as a picnic table, tree, or the corner of a building will provide a pop-up of that node's details.
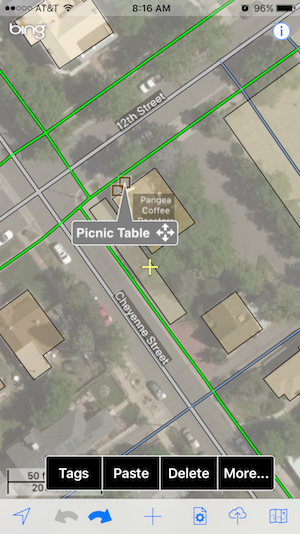
As the screenshots above show, when an object is selected you will have new options at the bottom for editing tags, reviewing the history and even deleting data.
Adding Details to the Map
Before you start adding details to OpenStreetMap, I recommend reading their Best Practices and Beginner's Guide.
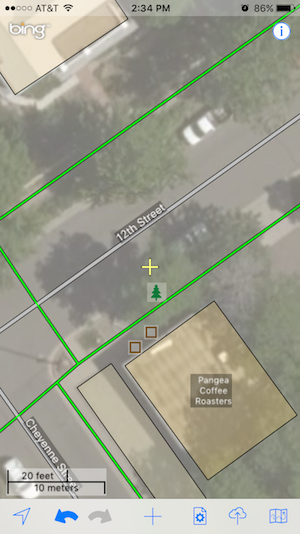
I've navigated to the location of Pangea Coffee Roasters who is hosting our upcoming mapping party in April 2016. I can see from the satellite imagery, and I know from personal knowledge that there's a big tree outside of the window facing 12th Street.
I center the yellow cross-hair at the location of the tree and touch the plus (+) button on the bottom toolbar.
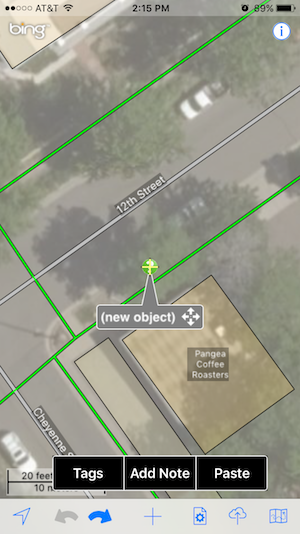
When working on the go, I find that I miss the mark somewhat frequently, luckily it is easy to move the new node. By touching and holding anywhere on the node's label you can drag the object around the screent to place it in the proper location. Notice the new point is labeled "(New object)".
Objects don't really exist until you add at least one Tag to it.
If I touch somewhere else on the screen now, the point would simply disappear.
However, I do want to add this tree so I'll tap Tags.
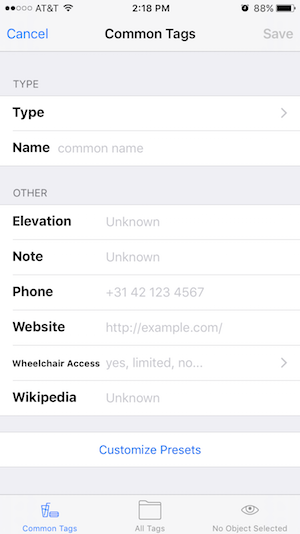
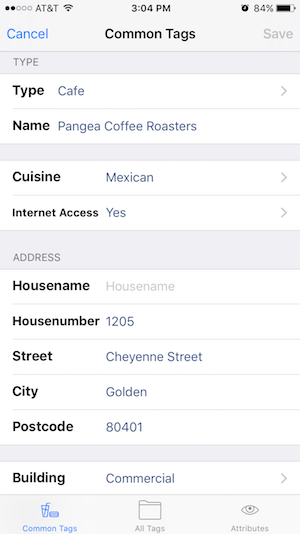
Notice there are buttons at the bottom of the Tags view, for this tutorial leave it on Common Tags.
I find myself using that screen the vast majority of the time, only switching to All Tags when I need some
of the more obscure tag options.
Tapping the Type field at the top of the Common Tags view will bring up the search functionality.
At the top there is a Search box, with your most recent used tags listed next. Below that is a listing of
all of the other most common tags.

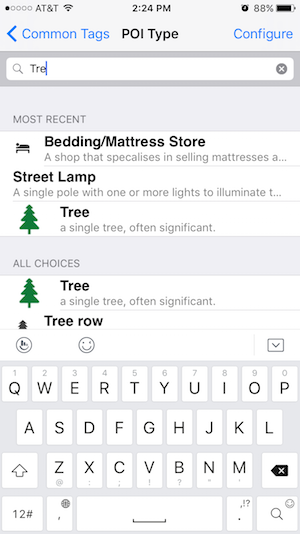
A tree is not one of my most recent 5 options, so I start typing Tree in the search box at the top.
Touching the Tree option takes you back to the Common Tags page. Notice that the options lower on the
page have updated to accomodate common tree attributes. This is a very handy feature of Go Map and can
save a lot of time when doing more complex data entry.
I'm not certain of any of those details at this time, so I won't add them now.
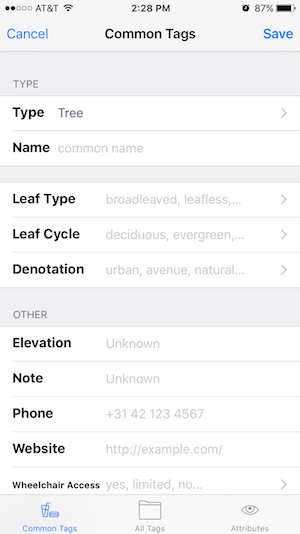
Touching Save at the top-right will take you back to the map, and the Tree is now visible on the map. Note that the changes have not yet been submitted to OpenStreetMap.
Upload Changes to OpenStreetMap
Typically you want to make a lot of changes at once and submit them in batches, but for this example I'm going to save this one single change of adding a tree. Touch the Upload button at the bottom (2nd from right) to start the process. You should type a message in the "Changeset Comment" box, and review the changes listed to ensure you're not accidentally making unintended changes. When you're ready to save the changes, press Commit at the top right corner.
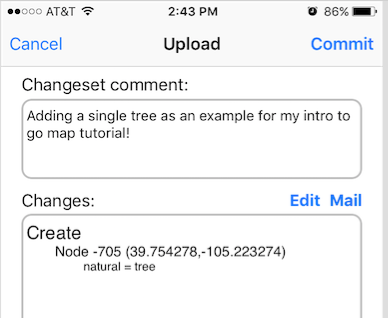
When you submit changes, you're directly updating the OpenStreetMap database. Be careful to only submit changes you are certain of!
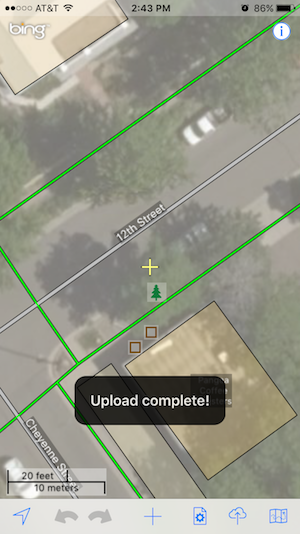
Depending on your network speed and the amount of changes you're making, you may get a spinning wheel for a few seconds, but you should see the "Upload complete" message before long.
View Changes in Browser
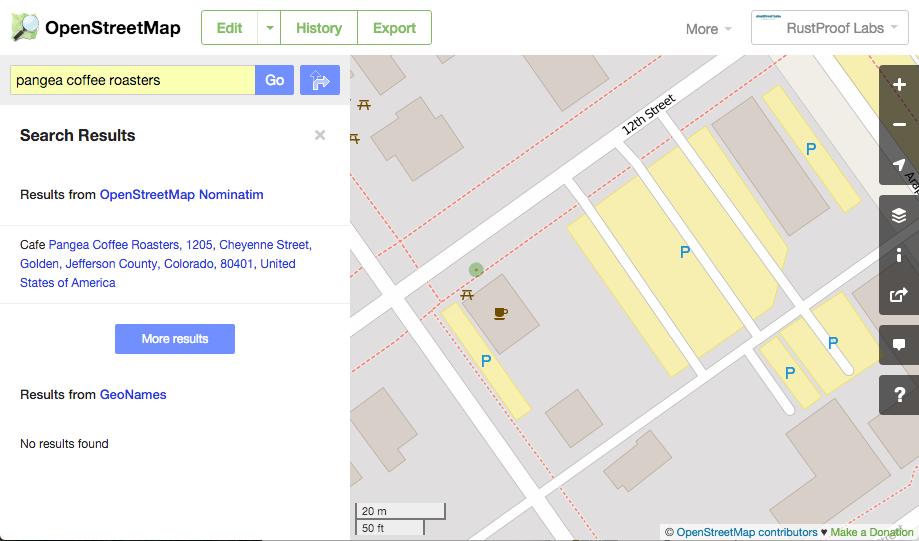
With the changes submitted I like to hop on OpenStreetMap.org from the browser on my laptop. It's always a good feeling to see the map improve as I make changes knowing that every other user of OpenStreetMap data is reaping the benefits as well.
Most changesets submitted to OSM appear online within 5-10 minutes submitting the changes. I search for Pangea Coffee Roasters and verify that the tree shows up as I expected.
To see the most recent changes you may need to force refresh your browser.
Creating Ways (Lines)
Go Map!! can also create lines and polygons, though I haven't done that much. I've been unable to get ways to join together (such as intersecting sidewalks) which seems to be common in my editing.
When I'm drawing building outlines, sidewalks, or any other complex data elements I use JOSM. JOSM is a free, cross-platform desktop editor that provides similar functionality to the Go Map!! app, but it allows for a lot more options. Also, having a full mouse and keyboard comes in handy!
Summary
This was a very quick introduction to using the Go Map!! app to edit OpenStreetMap data. Now that you know how to easily contribute data, you need to decide what data you want to collect. I personally have been collecting street addresses, businesses, parks, schools, street lamps, fire hydrants, trees, benches, cross-walks, and many other points of interest that catch my eye.
Take a look at your typical stomping grounds on OpenStreetMap and see what's there and what is missing. Has there been new construction in your area? Is a local street name incorrect? Are your favorite local businesses missing? Once you figure out what you can contribute, it's easy to research how to tag it properly. Check out the OSM Map Features page for more details about tags and how they're used. If that doesn't help you find what you're looking for I turn to Google and type "osm" followed by the object I want to learn how to tag. An easy example is searching for a tree, the first result here takes you directly to the page with all the details.
Much of the details about tags are obscured using Go Map!! which can be both a good thing and a bad thing.
As always, if you have questions or comments Contact Us!
For a final example of tags, here's what the full tags for Pangea Coffee Roasters looks like in Go Map!!
Happy Mapping!
 Mastodon