
Install Oracle Database on CentOS 7
Warning: This post is outdated. It is here for reference purposes only.
I recently wrote a post that walks you through creating a basic CentOS 7 virtual machine using Virtualbox. My purpose for creating that virtual machine was to setup a basic test system for Oracle Database. In this post I will walk you through installing Oracle Database XE 11g on a CentOS 7 virtual machine.
Note: In my first post I incorrectly stated that CentOS is a supported OS for Oracle DB. According to Oracle, it is not officially supported but since RHEL is supported, it makes sense that the CentOS derivative will work. So far I haven't had any troubles with it but please understand that it is not officially supported by Oracle.
Download Oracle XE 11g and Install PreReqs
Go to Oracle's download page to get the RPM installer. You need to accept their agreement before it will let you download the file. At the time of writing it was a 315 MB download, so be patient if your network speed isn't the greatest.
I realized that during my quick setup of CentOS I didn't install the zip utilities, so let's go ahead and do that while the Oracle installer is downloading.
sudo yum install zip unzip
Also, there are a few prerequisites that Oracle needs before it can install the database so I'll go ahead and do that as well.
yum install libaio bc flex
Move and Run the Installer
I typically download installers like this to my host machine so I can keep a copy on a backup drive and skip the download process in the future. But, that means I need to move the installer to my virtual machine. For this, I use scp to move it to my VM user's home directory:
(On host machine)
scp ~/Downloads/oracle-xe-11.2.0-1.0.x86_64.rpm.zip centosdev01:~/
(On virtual machine)
sudo su
mv oracle-xe-11.2.0-1.0.x86_64.rpm.zip /usr/local/src/
unzip oracle-xe-11.2.0-1.0.x86_64.rpm.zip
Unzipping the installer creates a "Disk1" subdirectory. Change to the Disk1 directory and install!
cd Disk1
rpm -ivh oracle-xe-11.2.0-1.0.x86_64.rpm

Success! Now we need to configure the database per the post-installation message seen in the screenshot above.
/etc/init.d/oracle-xe configure
I use the default port (8080) and database listener (1521) to keep things easy. I give SYS and SYSTEM users a secure password, and tell it to start the database on boot. Note that in a production system, your SYS and SYSTEM users should have different passwords!
Accessing Oracle Database Remotely
The database has been successfully installed so the next step is to setup remote access so I can connect from my host machine (OS X).
Login as the system user. You will be prompted for your password. You can also omit the username and it will prompt you for your username as well!
sqlplus system
Execute the command below to enable remote access.
SQL>  EXEC DBMS_XDB.SETLISTENERLOCALACCESS(FALSE);
quit
I check to see if the listener is running.
lsnrctl status
LSNRCTL for Linux: Version 11.2.0.2.0 - Production on 29-AUG-2014 11:04:30

Copyright (c) 1991, 2011, Oracle.  All rights reserved.

Connecting to (DESCRIPTION=(ADDRESS=(PROTOCOL=IPC)(KEY=EXTPROC_FOR_XE)))
TNS-12541: TNS:no listener
 TNS-12560: TNS:protocol adapter error
  TNS-00511: No listener
   Linux Error: 2: No such file or directory
Connecting to (DESCRIPTION=(ADDRESS=(PROTOCOL=TCP)(HOST=%hostname%)(PORT=1521)))
TNS-12545: Connect failed because target host or object does not exist
 TNS-12560: TNS:protocol adapter error
  TNS-00515: Connect failed because target host or object does not exist
That means the listener isn't running. Also, when I tried to start the listener as the oracle user, I received an error indicating that the listener isn't properly configured. It turns out that I forgot to put in the hostname for the server. I switch to the oracle user and edit the listener.ora file to remedy the situation.
sudo su oracle
nano /u01/app/oracle/product/11.2.0/xe/network/admin/listener.ora
Find the section below in listener.ora and replace the host name with yours. Note: You can't use the IP address of your virtual machine, you need to have this set to a valid host name as per /etc/hosts. If you selected a different port for the listener during configuration you will need to make sure that is reflected here.
LISTENER =
  (DESCRIPTION_LIST =
    (DESCRIPTION =
      (ADDRESS = (PROTOCOL = IPC)(KEY = EXTPROC_FOR_XE))
      (ADDRESS = (PROTOCOL = TCP)(HOST = centosdev01)(PORT = 1521))
    )
  )
Now to test to see if my hard work has paid off.
lsnrctl start
netstat -an | grep 1521
tcp        0      0 192.168.56.9:1521       0.0.0.0:*               LISTEN
The start command should tell you if it was successful or not, but the netstat command double checks that the listener was started on port 1521 like I wanted. This brought me to another minor issue because the port wasn't visible to my host machine. That's because the firewall was blocking it, and it took me a bit to figure out how firewalld works compared to iptables which I'm more familiar with.
First, I added the interface to my host-only network to the dmz zone of firewalld. Then I added the two ports, 8080 and 1521 in my case, to the dmz zone as well. You'll notice that each command is ran twice, once to make the change immediately and once to make the permanent change.
sudo firewall-cmd --zone=dmz --add-interface=enp0s8
sudo firewall-cmd --zone=dmz --add-interface=enp0s8 --permanent
sudo firewall-cmd --zone=dmz --add-port=8080/tcp
sudo firewall-cmd --zone=dmz --add-port=8080/tcp --permanent
sudo firewall-cmd --zone=dmz --add-port=1521/tcp
sudo firewall-cmd --zone=dmz --add-port=1521/tcp --permanent
Now that firewalld has been updated, I run nmap from my host machine to ensure that I can see the service on port 1521.
nmap -p 1521 192.168.56.9

Starting Nmap 6.25 ( http://nmap.org ) at 2014-08-16 11:16 MDT
Nmap scan report for centosdev01 (192.168.56.9)
Host is up (0.00036s latency).
PORT     STATE SERVICE
1521/tcp open  oracle

Nmap done: 1 IP address (1 host up) scanned in 0.06 seconds
Great, it worked!
SQL Developer Tools
To test the remote connection, I downloaded Oracle SQL Developer 4 and installed it. It seems to be a bit picky about the Java version used and I had to get my version up to date before proceeding. Once I got SQL Developer installed I created a new connection to my VM named CENTOSDEV01 to match the name I've given the server. Since this is a development server, I allow the software to remember my password, but if this were a production box I would not check the "Save Password" box.
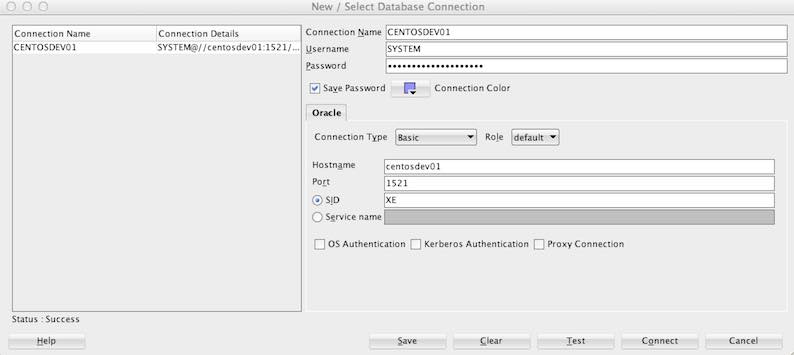
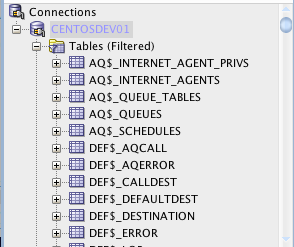
After setting up the connection you should be able to connect to your database
instance. Expanding the "Tables" under the server connection shows the system
tables that exist in the database.
Conclusion
At this point I have a development CentOS 7 virtual machine that is running Oracle XE 11g, and I can connect to it remotely from my host machine using SQL Developer. I have definitely skimmed over some steps that would be critical for a production machine, but for my testing and development needs, this will be more than sufficient.
 Mastodon