
Creating a Web Interface for SQL Server Powered Application
This post covers how to get an ASP.NET Web Application to connect to the DEMO SQL database we created here. This is not a full tutorial on creating Web Applications, but instead focuses on how to connect the project to a database.
If you have already followed that mini-series, you ended up with an MS Access database as a UI. This post assumes you've followed at least the first post and have created the database DEMO with the three tables, two views, and one stored procedure.
Getting Started
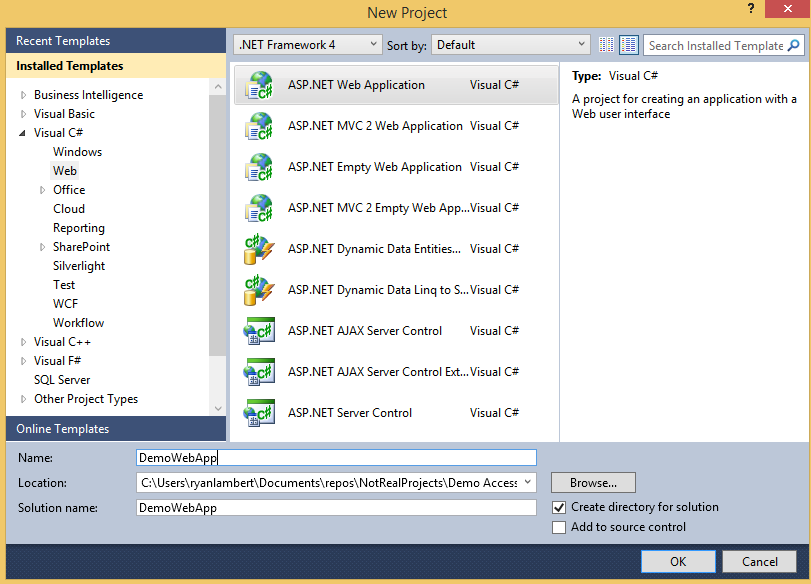
Open up Visual Studio and create a New Project named "DemoWebApp". For this tutorial we'll be creating an ASP.NET Web Application using the Visual C# language.
Exploring Your Web Application
When you create an ASP.NET web application it creates a working shell for you to start with. You can view all the files created using the Solution Explorer in VS. Go ahead and take a peak around. The Default.aspx page will be loaded when you run or debug your web application using the Site.Master template.

Setting Up the Connection to SQL
The first thing I do when creating a database driven web application is to get
the database connection setup. Open up the file Web.config to continue.
Towards the top there should be a
<connectionStrings>
     <add name="DEMO_sql_ConnectionString"
      connectionString="Data Source=WIN8DEV\SQLDEV01;Initial Catalog=DEMO;Integrated Security=True"
      providerName="System.Data.SqlClient"
    />
</connectionStrings>
Create a New Page
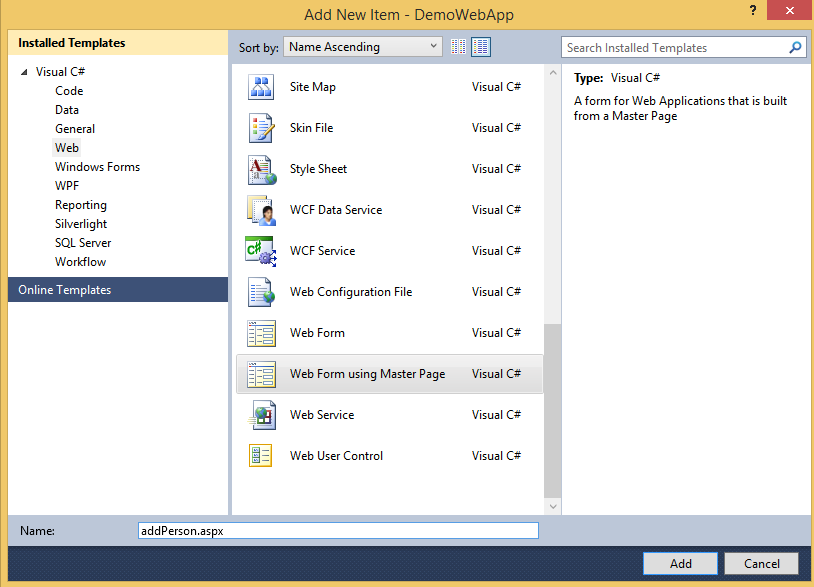
Following the example of the Access database, the first page will be a form to add a new person using the dbo.addNewPerson stored procedure in the DEMO database. To create a new .aspx page, right click on the project in the Solution Explorer and click "Add" -> "New Item". In the Add New Item menu choose the option "Web Form using Master Page" and give the form a name. Select the Master page you want to use (Site.Master) when prompted and your new .aspx page will be created.
The newly created page will be opened automatically, make sure the editor window is in Source view and paste the code below into one of the content placeholders. You can view any web page you have open by simply hitting Ctrl+Shift+W when you have the page open. (Obviously I shouldn't be using inline styling, but I decided to for the purpose of time in this demo.)
<div style="clear:both;width:98%;">
        <div style="float:left;max-width:30%;padding-right:5px;">
            <asp:Label ID="lblNameFirst" runat="server" Text="First Name:"></asp:Label><br />
            <asp:TextBox ID="nameFirst" runat="server"></asp:TextBox>
        </div>
        <div style="float:left;max-width:30%;padding-right:5px;">
            <asp:Label ID="lblNameMI" runat="server" Text="MI:"></asp:Label><br />
            <asp:TextBox ID="nameMI" runat="server"></asp:TextBox>
        </div>
        <div style="float:left;max-width:30%;padding-right:5px;">
            <asp:Label ID="lblNameLast" runat="server" Text="Last Name:"></asp:Label><br />
            <asp:TextBox ID="nameLast" runat="server"></asp:TextBox>
        </div>
    </div>
    <div style="clear:both;width:98%;">
        <div style="float:left;max-width:30%;padding-right:5px;">
            <asp:Label ID="lblSex" runat="server" Text = "Gender"></asp:Label><br />
            <asp:ListBox ID="sex" runat="server" Rows="2"></asp:ListBox>
        </div>
        <div style="float:left;max-width:30%;padding-right:5px;">
            <asp:Label ID="lblDob" runat="server" Text = "Date of Birth"></asp:Label><br />
            <asp:TextBox ID="dob" runat="server"></asp:TextBox>
        </div>
        <div style="float:left;max-width:30%;padding-right:5px;">
            <asp:Label ID="lblDepartment" runat="server" Text="Department"></asp:Label><br />
            <asp:ListBox ID="department" runat="server"></asp:ListBox>
        </div>

    </div>
    <div style="clear:both;width:98%;">
        <asp:Button ID="btnAddPerson" runat="server" Text="Add Person" />
    </div>
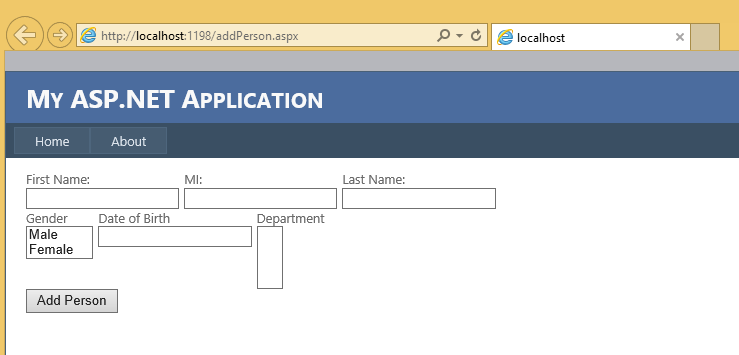
Viewing our newly created form you can see how poorly formatted it is, but for the purpose of testing our SQL connection this will suffice.
Populate Controls with Code Behind
The code I gave above doesn't explain how the Gender listbox control is populated, but you'll also notice the Department listbox is still empty. In this next step you will learn how to add items to a control by querying SQL for available options. This will be our first real test to ensure the connection string we defined earlier is correct.
Each .aspx page has two files for code: the code for the presentation layer (.aspx file) and "code behind" that can be accessed by expanding the aspx page in Solution Explorer and opening the ".aspx.cs" file.
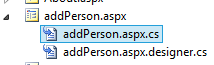
Go ahead and open the code behind by double clicking on addPerson.aspx.cs. We will create a new method that to populate the Department listbox control and trigger that method from the Page_Load method. The Page_Load() method is created automatically when you create an .aspx web form. The first step is to add a new line towards the top to allow the connection to SQL.
using System.Data.SqlClient;
Now create a new method inside the class (or partial class) in the code behind
named setDepartmentListBox():
private void setDepartmentListBox()
{
    department.Items.Clear();

    System.Configuration.Configuration WebConfig =
        System.Web.Configuration.WebConfigurationManager.OpenWebConfiguration("/DemoWebApp");
    string connString;
    if (WebConfig.ConnectionStrings.ConnectionStrings.Count > 0)
    {
        connString = WebConfig.ConnectionStrings.ConnectionStrings["DEMO_sql_ConnectionString"].ToString();

        using (SqlConnection con = new SqlConnection(connString))
        {
            string sqlQuery = "SELECT deptID, deptName FROM vDept ";
            con.Open();
            using (SqlCommand command = new SqlCommand(sqlQuery, con))
            using (SqlDataReader reader = command.ExecuteReader())
            {
                ListItem newItem = new ListItem();
                while (reader.Read())
                {
                    int deptID = reader.GetInt32(0);
                    string deptName = reader.GetString(1);
                    newItem = new ListItem();
                    newItem.Value = reader["deptID"].ToString();
                    newItem.Text = reader["deptName"].ToString();
                    department.Items.Add(newItem);
                }
            }
        }
    }
}
The next time we run this web page (Ctrl+Shift+W) the department listbox control should populate with the options from dbo.vDept view in the database. Go ahead and test it out, I'll wait!
Add Action to the Form
Now that the basic form has been created and our connection to SQL has been verified, it is time to submit data to the dbo.addNewPerson stored procedure from the form. The easiest way (for me) to add the appropriate action to the button (code behind) is by switching the web form to Design view and double clicking on the Add Person button. This will create and open a new method in the code behind that will be executed when the button is clicked. In this case it's named "btnAddPerson_Click".
protected void btnAddPerson_Click(object sender, EventArgs e)
{
    System.Configuration.Configuration WebConfig =
        System.Web.Configuration.WebConfigurationManager.OpenWebConfiguration("/DemoWebApp");
    string connString;
    if (WebConfig.ConnectionStrings.ConnectionStrings.Count > 0)
    {
        connString = WebConfig.ConnectionStrings.ConnectionStrings["DEMO_sql_ConnectionString"].ToString();
        using (SqlConnection con = new SqlConnection(connString))
        {
            string sqlQuery = "dbo.addNewPerson";
            con.Open();
            SqlCommand command = new SqlCommand(sqlQuery, con);
            command.CommandType = System.Data.CommandType.StoredProcedure;
            command.Parameters.AddWithValue("@nameFirst", nameFirst.Text);
            command.Parameters.AddWithValue("@nameMI", nameMI.Text);
            command.Parameters.AddWithValue("@nameLast", nameLast.Text);
            command.Parameters.AddWithValue("@dob", dob.Text);
            command.Parameters.AddWithValue("@sex", sex.SelectedValue);
            command.Parameters.AddWithValue("@deptID", department.SelectedValue);
            command.ExecuteNonQuery();
        }
    }
}
Wrapping Up
Obviously, this is not production ready code because it is missing form input validation and error handling, and after submitting the data it should display some sort of confirmation and probably redirect to a different page on the site. But, we have seen how to read data from a view as well as modify data (INSERT in this case) by executing a stored procedure. If you already read about avoiding Spreadsheet Hell then you know that my applications only have two ways to interact with the database: views and stored procedures. We now know how to interact with these objects so the rest of the UI really comes down to getting the presentation layer functioning properly.
 Mastodon