
Connecting SQL and MS Access - Part 2
In Part 1 of "Connecting SQL and MS Access" we created a basic database in SQL Server with three tables, two views and one stored procedure. In this post we're going to create a MS Access front-end database and link it to the views we created. We won't link to the base tables because we want all data access filtered through the views and stored procedures. If you are using a version other than Access 2007 or 2010 your steps may vary.
Connecting the Pieces
First we need to create an MS Access database to use as the front-end interface. I've created an empty MS Access database and named it "EmployeeTracking". Your first time opening the database you will most likely see a bar like this toward the top:

You must click "Enable Content"!
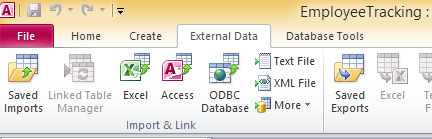
The first thing we will want to do is to create links to the views created in SQL. Select the "External Data" ribbon option (I guess that's what it's called) and click the ODBC Database button.
This will bring up a typical Wizard style set of options. The series of steps we need to go through can be a bit confusing at first, so don't worry if you don't fully understand all the details at first. Essentially, we are going to create a file that stores the configuration details of how to connect to SQL. These steps are typically only necessary once per SQL database.
The first page of the Wizard gives you an option to either Import or Link to data. Because we want SQL to store the data we must choose Link. Choosing Import simply takes a snapshot of the database right now, but doesn't maintain a connection to SQL.
Create The DSN File
The next step is to create a new DSN file: the file storing config details, also called "File Data Source". There are other methods of connecting to databases, but I do not cover them here. I use DSN file because that allows me to easily switch between development and production SQL servers by simply pointing the database to a different DSN file.
With the screen below open, click the "New..." button on the right side of the screen to bring up the "Create New Data Source" dialog box and a list of options.
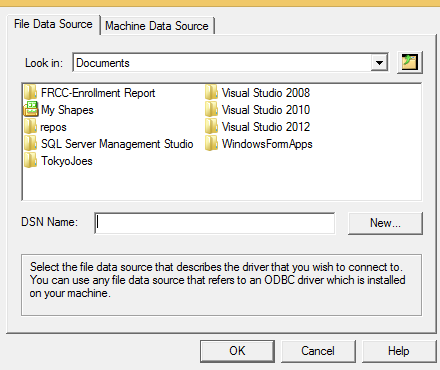
Scroll down through the list until you see "SQL Server". Select it and click "Next." Then click "Browse" on the next screen and navigate to the location where you would like to save the DSN file. I typically save the DSN files at the project's root right next to the MS Access database. Give the file a name (I used DemoDB.dsn), and save the file. Click "Next" followed by "Finish".
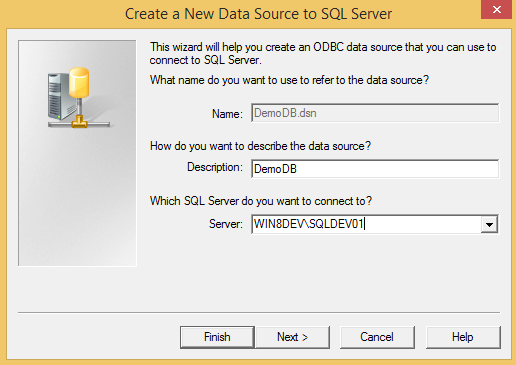
Now give your data source a description and enter the path to the SQL Server. Below is what I'm using for my development server.
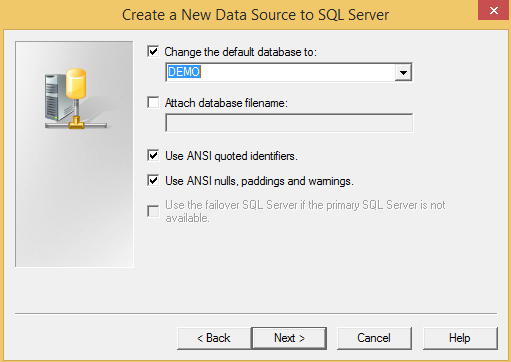
After clicking Next you have the option of selecting using Windows NT or login based Authentication. You should use what's appropriate for your setup. We use Active Directory so I'm able to take advantage of Windows NT authentication. After selecting authentication method, click Next and make sure it is set to change the default database to the database you are using for your application. We named our database DEMO so that's what I select.
Last, click "Next", followed by "Finish" (yup, again, but there's still one more step!). After clicking Finish you should have a dialog with the option to "Test Data Source...", now is your chance to make sure you did all the steps correctly. If you get anything but a success message, examine your settings and try again.
After you get the Success message, click OK to save the DSN file. Now select the new DSN you just created from the list and click OK. Phew....
Select Objects To Link to
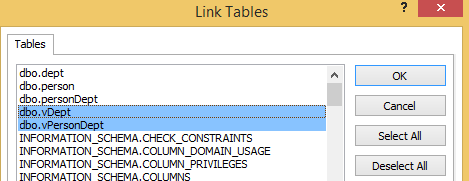
If you're following along you should now have a list of tables and views to select from, these are the objects that Access will let you link to. Please, for your database's sake, only link to the objects your users will actually Need, not just what you think they might need and certainly not everything! It is very easy to add a link to a new table or view later, it is much harder to remove a link later with no uncertainty of what might break. Follow the principle of least privilege....
This dialog allows for the typical methods of multi-selection using Shift+, Ctrl+, and/or Command+ Click (depending on your OS and device). I have selected the two views I created in the last post and nothing else. Click OK to proceed to the next step.
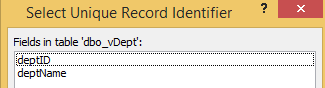
Select Unique Record Identifiers?
When you link to tables, Access will prompt you to select fields that make up unique identifies, which most people would call "primary keys". This step is optional, and sometimes recommended or required. Skipping this step in Access when linking to properly designed database tables will do no harm. It will only prevent you from updating data via views, etc., and that is desirable for my design anyway. (I think that's the only side-effect, but correct me if I'm wrong!)
For this database, you can either select the unique identifier (the id fields) or you can skip it. I'm going to skip it by not selecting anything and hitting OK for both views I'm linking to.
Celebration!
Now you should have linked data sources in your MS Access database! The icon indicates it's a linked table and you can see details about the connection if you hover your mouse over a linked table.
You might notice that Access brings in the schema of the objects you linked to, but replaces the period ( . ) with an underscore ( _ ), so instead of dbo.vDept, we have dbo_vDept.

Notice the icon of the "tables", the hover over text giving details about the connection, and the data displayed from dbo.vPersonDept
Finishing Thoughts
There are a few minor details I want to cover to hopefully save someone a future headache with troubleshooting!
Refreshing Linked Objects
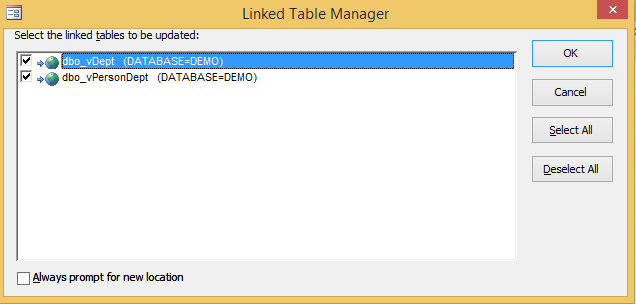
If the schema of a linked object (table or view) changes, you must tell Access to update its schema. While I could tell you exactly when you do and don't need to refresh, it's quicker and better to say "When in doubt, refresh." Kinda like saving. (Save often!) So, how do you do this?
Right Click on any linked table in MS Access and click "Linked Table Manager" from the menu. Click "Select All" on the right hand side, and OK. This is the kind of action it never hurts to do, if nothing changed, no big deal. If something changed, cool, it's fixed now.
Bonus - Dev and Prod Servers
Quick! Look back at the last screenshot at the bottom of the dialog. See the checkbox that says "Always prompt for new location"? If you check that before clicking OK, it will allow you to select a new DSN file that points to a different database or even a different database server! Cool, huh?
Next Step
Now that we have a link to the data we'll want to bring in, the next step is setting up the database to be able to add new data. As I've said before, all data modifications go through stored procedures so that's our next step: executing the stored procedure we created. See the third and final post in this series to see how!
 Mastodon