
Long Road - Setup Your Dev VM (Part 1)
Warning: This post is outdated. It is here for reference purposes only.
This is the second of many posts about developing BCS Group's automated backup and restore system, but is also the first of three posts that go over how I setup my development virtual machines. If you haven't read the first post, go ahead and check it out if you like! I'll wait.... That post also contains direct links to all the other posts in this series.
Use Virtual Machines
If you don't already use virtual machines, you should. It allows you to try out new things, experiment in a safe environment, and simulate your production environments. I have chosen to use Debian and for now, I plan on sticking with it. Currently I'm using Debian 7.x 64-bit on all my Linux boxes including production, except for the one Ubuntu desktop I use occasionally. I like Debian because it's stable, fairly standard and thus well documented, and runs with low resources. Typically I give my VMs 1 GB ram and 1 core, but I have never had issues with only 512 MB for a Debian box.
I won't cover details of installing VirtualBox, but go ahead and get that ready, download Debian, and let's begin.
Setting up the VM
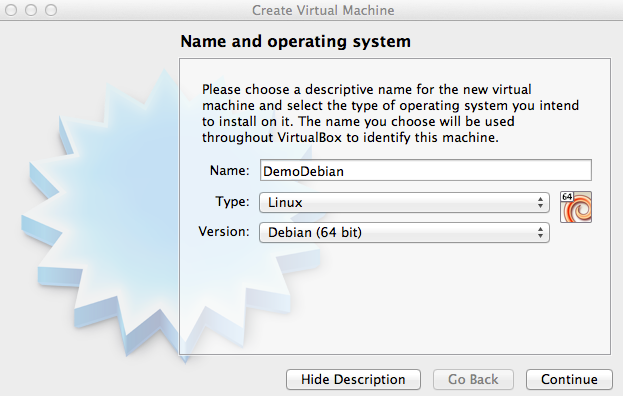
Start VirtualBox, and Click "New". Give your virtual machine a name, I would suggest picking a name that's easy to type. For development servers I reuse this name everywhere to make it easy.
Next it will ask for RAM, I will choose 512 MB for this VM but I typically give them 1024 MB just because I can. Clicking continue will leave you at the settings for the hard drive. Each virtual machine needs to have a virtual hard drive to use, they can share but I have not attempted that. Instead, I always make dedicated drives for each VM. It's telling me it recommends 8 GB, but I'm going to give it 10GB, again because I can. I have a habit of testing multiple backups and that can take up a good amount of space at times so I prefer to have a little extra buffer. It will prompt you to choose a hard drive type, I've always used VDI because I have always used VirtualBox.
Next you have the choice of dynamically allocated or fixed size. There are some pros and cons, but I almost always choose dynamically allocated. I prefer to take up less space than have slightly faster speeds. Also, my 13" Macbook Pro has a slooow 5200 rpm drive, so I'm already dealing with a slow drive and I can't say I've noticed much difference in casual observations. Next, you will then be prompted to name your hard drive and again I typically choose the same name as the VM itself.
Now What?
After creating the hard drive, the window just disappears. Just click "Start" and then the fun really begins! You will need to tell it where to find the debian iso you downloaded to install from:
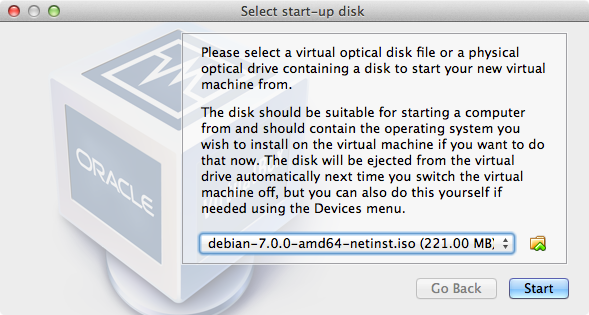
The install process is pretty painless, I choose "Install" -> "English" -> "United States" -> "American English" -> Now wait for a bit....
Next, I get prompted for the hostname. Again, I'm going to enter "DemoDebian" to keep it consistent. Next, the domain name, also with the same name. (Keep in mind, this is a dev only box)
Next you'll be prompted to enter a root password. Enter your name, your main username (not root!), and password for your main account. Choose your timezone, wait a few seconds and now to partition options. For most development environments there should be no problem with "Guided - Use entire disk". That discussion goes beyond the scope of this post! Finish with the partitioning options and write changes to disk... then a big and scary "yes/no" prompt comes up to make sure you're really sure that you want to do what you told it to... choose "Yes" and be ready to wait a bit more.
Enter through the mirror, and package manager... the defaults always work for me. Next, leave the HTTP proxy blank.
Wait again. This is the longest wait of the install process I'm pretty sure. Go grab a beer and fire up the grill while you wait, it'll be fine. Really.
Almost There!
After waiting a little while, you will be asked if you want to participate in the usage tracking, make your choice. The next step is a multi-select of options to pre-install software for you. Make sure the Debian Desktop Environment is unchecked, check the web server (apache2), unselect the print server, check the SSH server and uncheck "Laptop".
Now, the second longest wait. After it finishes installing it will prompt you to remove the install media, and you can ignore that due to the configuration of VirtualBox and click Continue to restart. The virtual machine will boot up and leave you at the login screen, the initial install is complete!
My next post covers getting sudo setup for your user and connecting to your new virtual machine using SSH keys. The third post in this mini series covers installing all the various packages. s
 Mastodon